Sunday 29 November 2015

Behind the Scenes: Pic n Mix Party Design


I have spent the past week creating an event design with fellow theatre designer Philippa Thomas for Bath University.

Kola Kube table


The joy of working with Bath Uni is we were to set the party in a newly built theatre space, meaning fantastic potential for lighting and suspending from the rig.


Our only rule was that each table was to be themed around a sweet. So off we went!

Liquorice Allsorts Table


Philippa and I developed a  Pic n Mix Pinterest Board around the idea, simplifying the shapes and colours of some our favourite childhood sweets. This resulted in a geometric approach and a colour pop palette.


We needed to create height in the space, but also had to not  take up too much space on the rather small tables. Therefore, we opted for over sized spherical balloons and decorated garlands that would stretch far up in to the rig. For a contrast, we also designed a few tables with suspended garlands that cascaded down and hovered above the tables.

Love Hearts Table

The challenge was creating a strong enough design with just the tables and space above them as our canvas. On a past event design, I discovered the effectiveness of doing away with table cloths and emphasising the sharp edges of bare table by edging them with coloured wash tape. Philippa sourced appropriate coloured/patterned tapes to match our sweets.  My particular favourite was the black and white Liquorice Allsort edged table.

Gobstopper Table
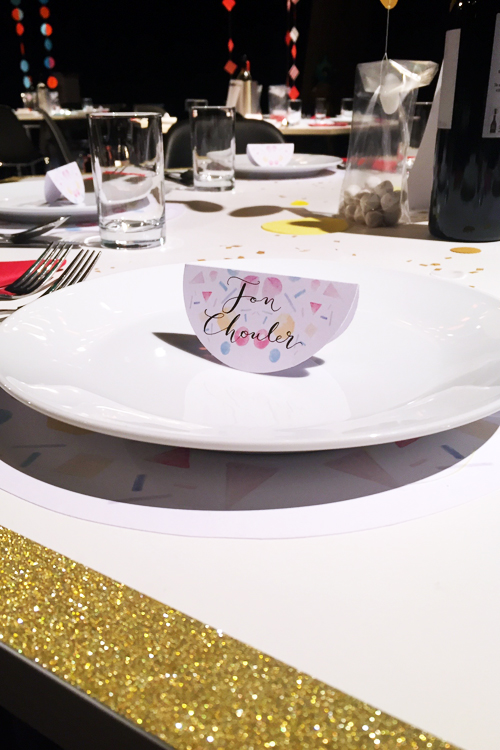
As a stationery designer and watercolour artist I was really excited to get started on the place cards. Phil had the bright idea of keeping the folded card as a circle to follow along the theme of the sweets' shapes. It also allowed the place card to rock back and forth which everyone enjoyed! I worked on a kaleidoscopic pattern using basic watercolour shapes and arranging them into a pattern. Once I had printed and cut them out I finished them off with some hand written modern calligraphy.


We tried out different techniques in creating our garlands. The quickest method was to run the card pieces through the sewing machine and allowing the thread to sew itself through creating the string.


We also created garlands by knotting piece of ribbon together and adding trinkets of raffia, cut out paper and more ribbon! It was all about creating a rich texture so the balloons didn't just take centre stage.


We also sprinkled themed confetti over each table to break up the whiteness. We were so lucky to have hexagonal tables, a perfect compliment to our theme!


Thursday 19 November 2015

Reader ticket discount for Kirstie Allsopp Christmas Handmade Fair!


Flower crown Queen Kirstie Crafting at the Fair

Congratulations to our giveaway winner who has two free entry tickets to this weekend's Christmas Handmade Fair in association with Mollie Makes!

But we've got an extra special treat for all of you who are still clamouring for tickets!

Just enter this discount code and get Full Experience ticket for £20 instead of £25. This offer expires on the 21st November, so don't delay.

FULC20 

T&Cs: Booking and transaction fees apply. Offer applies to Full Experience tickets purchased in advance only and offer ends 21st November.


I'm going tomorrow and can't wait to soak up all the Christmas Crafting inspiration, It's also a great excuse to visit Manchester which has always felt so far away from down here in Bristol.

Crafters at the Fair getting stuck in with 'Knitting Rocks' 


Monday 26 October 2015

Kirstie Allsopp's Handmade Christmas Fair Giveaway


Hey Readers, I have a great opportunity for one of you to win a pair of entry only tickets in association with Mollie Makes to Kirstie Allsopp's Christmas Handmade Fair! in Manchester Central, November 20-22. 

Grand Group Makes all together

Wonderful stalls and shopping!


You can choose which day you want to attend, there are masterclasses, talks, brilliant stalls and some great Christmas inspiration. 

The fair features appearances from some crafting heroes and heroines of mine: 
Annie Sloan, Kitten Grayson, Zeena Shah, Jane Means, The Ministry of Craft, Lucy from Attic 4, Corrie’s Martin Platt (Sean Wilson) who is now a cheesemaker - and Kirstie of course! 

Beautiful details and design across the fair!

If you want to be in with a chance of winning the tickets to this brilliant Christmas event, just tweet me @harrietdewinton using the hashtag #harrietschristmasgiveaway and share your favourite Christmas Craft Project. 


The winner will have their name drawn out of the pom pom hat on Friday 6th November. I will contact you over Twitter to arrange your prize!

Here's a great Christmas Craft project of my own to get you in the mood. I know Kirstie loves pompoms,  so this will be right up her street.

Kirstie and the world record breaking pompoms!


As a contributor to the Mollie Makes Christmas Issue, I am thrilled to be able to offer a reader two entry only tickets to the Handmade Christmas Fair in Manchester 20-22 November at Manchester Central.

This is a cute take on the classic bobble hat, I've seen them all over the place on the highstreet but thought it was a prime opportunity to teach you all how to make pom poms or…just to jog your memory from Junior School.


Do you remember making pompom robin Christmas decorations at primary school? You’d bring it home and your parents would have to feign joy at their little cherubs effort and then hang it on their Christmas tree for the next 15 years. 

This is a classic black and white combo, but why not mix it up and add more pompoms!

You will need:  
  • Ball of black wool
  • white plain beanie
  • Cardboard (a cereal packet will suffice) 
  • Knitting hook  
  • Scissors
  • Needle and thread to attach finished pompoms 
How to:
  1. Draw and cut out 2 cardboard rings.  Follow our pattern as a guide. 
  2. Cut a length of wool about 2 metres long and fold in half.
  3. Tie the2 cardboard rings together with the length of wool and continue wrapping this length of wool around the 2 rings. Feed the wool through the hole in the middle of both rings each time. 
  4. Continue this process, cutting new lengths of wool as the last runs out.  Use the knitting hook to pull the wool though as the hole becomes full.
  5. Once you cannot pull any more wool through the centre of the ring, cut all the way around the outer edge of the ring.
  6. Wrap a length of wool between the 2 cardboard rings and tie a few tight knots. These will secure all the wool in place.
  7. Tear the 2 cardboard rings to remove them from the centre of the pompom.
  8. Trim the pompom to size.


Good luck!


Thursday 23 April 2015

DIY Tutorial: Golden animal place name holders

I saw this idea on pinterest a while ago and feel head over heels in love for it.

Found on onewed

These from Bridal Musings

And these from Sugar and Cloth blog
 It seems like a beautifully detailed and clever project, whilst being relatively simple to do and not all that expensive.

Annoyingly, I didn't seem to have any toy animal figurines knocking about - and that's even after raiding mum's attic for things to sell at a car boot sale last week.  Therefore I went to Amazon and picked up  a few packs of these.


The first step is probably the trickiest. Cutting a slice in the back of the toy to sit the card.

Elephant modelling the 'half body cut'
You could choose between clamping the toy and using a saw, or heating a knife and melting/cutting through the plastic. You just want to cut half way down through the body. Either way, both are potentially hazardous, please do so with care and suitable supervision.


 Serious part over...or is it? Now time for the toxic chemicals! Gold Spray Paint - again this is a case of just being sensible. Spray in a well ventilated area on a protected surface. Let the animals dry, turn them over and fill in the gaps with one last spray. Leave to fully dry.

Add caption

They look pretty magnificent once dried. Then you can slot a place card in, sit back and wait for the praise and glory.


Friday 3 April 2015

Alice in Wonderland Shoot for Specsavers Kids


All those rather mysterious Alice in Wonderland themed projects can finally be unmasked in the shape of the latest Supersavers Kids magazine. I styled and illustrated the cover and main set piece for the Spring Summer 2015 issue.


The first job was to design the looks for Alice, the Queen of Hearts, Mad Hatter and White Rabbit. We have 4 fantastic 6/7 year  old models who had a great time on the day. Our Alice outfit was a particular favourite as I thought a bit outside the box and came up with this slightly dreamy floral dress from John Lewis.

The brief was to dress them in clothes they would want to wear; looking clearly like the character without looking like fancy dress.


The Queen of Hearts' outfit was largely from H&M and Doc Martins from John Lewis. Her crown headband was a particular favourite with the adults on the shoot!

on the shoot with Milo and Oli.


Can you spot the playing card bow tie and collar from previous blog posts? Alice's hair bow also makes an appearance.


We set up the shoot the night before which gave us lots of time to play with flamingoes and cupcakes!

Then came the illustration part. After settling on handpainted watercolour style (which is obviously my favourite!) I created a wonderland esque backdrop for both the cover and double page spread.


White Rabbit late for an important date


starting to add colour to the double page spread

adding in flamingoes all over the place. 

 The Magazine is out in the shops now. The project was managed by Specialist UK