Showing posts with label Fashion Fix. Show all posts

Friday, 23 January 2015

Alice in Wonderland shoot DIY makes: Bow


There seem to be bows a plenty in Alice in Wonderland. It may have something to do with it's edwardian origins; ruffles and bows on everything possible. 


For this shoot, I am styling four characters with a playful nod to the images and icons from the stories, but not going too literal or 'costumey'.

Timing is everything, and this Christmas I managed to obtain not one, not two, but THREE miniature packs of playing card from the inside of numerous pulled crackers.


They are a fantastic resource as their diminuitive scale allows you to do some really delicate work. This fan of cards is the beginnings of a hair accessory for the Queen of Hearts.


Bow Tie

You will need:

  • miniature playing cards
  • all purpose glue
  • scissors
  • sellotape
  • 3/4 m black ribbon 1 cm width.

I took four cards, two for each side of the bow tie and concertina folded them. I overlapped the inner edges on each side to give it a bit of structure.
 

I fixed it with glue and some tape on the back edge. I then took one more card and concertina folded it to match the central folds and placed it on top of the centre of the bow tie and glued in place.
 

I wrapped black ribbon around the middle and strung another piece of black ribbon inside this loop to make a neck tie for the bow tie. This one ties at the back and is hidden under the collar. I am sure if you wanted a more permanent playing card bow tie you could fix a proper bow tie fastening, but this works perfectly for this shoot!


Sunday, 23 November 2014

Fashion Fix: 'Terry de Havilland for Liberty' inspired print covered wedges

photo from aurelia skincare
How many of you have been watching the fly-on-the-wall doc, Liberty of London?

I've got to say, when the first series cam out, I was dubious about seeing a warts and all reveal of one of my favourite escapist spots. However, I didn't need to fear this series, when the wonderful shoe designer and maker Terry de Havilland was featured in a collaboration with the store and their 49,000 prints!

It was a thrill to get a tweet favourited by the legendary store in the meantime!


Terry's trademark wedge sandal was given a Liberty makeover and here are some of my favourites, available now in store.

Purple Totem Elephant Print Wedge Sandals. The colours are perfect for Autumn Winter and would work perfectly with heavy denier black tights and the season's favourite fabrics; leather and velvet.


Red is my favourite colour at the moment and the Red Daisy Mitsi Peep Toe Sandals are one to purchase now and wear them long into next year.


The beautiful, bold teal and turquoise of this pair perfectly sum up the collaboration of 70's trend king de Havilland and the eccentric, timeless beauty all Liberty prints embody, regardless of the year of their birth. Teal Totem Marky Wedge Sandals

But this would not be Fixuplookchic without an alternative suggestion whilst you are waiting, saving up to be able to afford such luxuries. A year back, I took my own favourite Liberty Print fabric and adorned a pair of navy suede heeled boots. You can do the same with my tutorial below.


I've been looking forward to getting my toes into these autumn stunners. The embellished heel was all over the place last year but there weren't too many autumnal day alternatives. That is all about to change.

You will need: 

  • A pair of shoes with block heels 
  • Lightweight fabric, enough to cover each heel. We used Silk. 
  • Pattern paper 
  • Fabric scissors 
  • Paper scissors 
  • All purpose glue 

How to do it: 

  1. Make a pattern for your heel using pattern paper, allow for a small seam allowance to be folded under. 
  2. Trace around the pattern onto your fabric and cut out. Make one for each heel 
  3. Dab allpurpose glue onto a small section of the heel (starting at the base and working upwards) and glue the fabric in place, turning under any raw edges, and tugging it taut so there are no crinkles.   

TOP TIP- You will find this works best on block heels.

Shoes from: New Look
Fabric from 
sewbox


Sunday, 19 October 2014

Fashion Fix Revisited: Silk scarf pillow case

Amanda Thomas Photography

Now the muggy summer months are over and we sink into a cosy, autumnal slump, it's time for my hair to take another beating from the elements. Wind and rain are as bad as humidity and beating sunlight, so I thought it's high time I revisited one of most popular fashion fixes from last year; the silk scarf pillow. Inspired by Harpers Bazaar's tips to tame frizzy hair, I jumped at the chance of a wallet friendly tip. Et voila, the Silk Scarf Pillow Fashion Fix.

The biggest money saver on this is to use a silk scarf rather than fork out for metres of silk. They are easily sourced in local charity shops as I don't tend to find 100% silk content ones in the highstreet stores

You will need:

  • A plain pillow case
  • Enough silk to cover one side
  • sewing machine
  • dressmaking scissors
  • dressmaking pins
  • tailor's chalk

How to do it:
  1. Place your pillowcase right sides together on top of the silk and use as a template. Draw around on the silk using tailor's chalk, leaving 1.5cm seam allowance. Cut out.
  2. unpick or cut out one side of the pillow case. (retain the rectangle that has the folded over inner piece that keeps the pillow in place)
  3. place the pillow rectangle and the silk rectangle right sides together and pin around 3 sides leaving the opening unpinned.
  4. Machine sew a running stitch all around the pinned sides.
  5. trim the edges and corners, turn inside out and press.


Amanda Thomas Photography

Thursday, 31 July 2014

Fashion Fix revisited: Sailor Collar


The most popular Fashion Fix that ever made its way on my blog is the Sailor Collar. Its a real favourite of mine and it's awesome that you all loved it so much too. Recently I got an email from a reader asking for some dimensions of the pattern piece. The idea with the pattern piece is that you can scale it up or down to be whatever size you would like, but I have done a new one with the measurements I would use were I making it for myself.


For the full Fashion Fix project click here

Wednesday, 7 May 2014

Fashion Fix 1st Birthday: Revisiting the Burberry Aztec Beaded Yoke


It's time to have a look back at some of my favourite summer fashion fixes of the past year. I've now been working on this blog for a year and as my readership has grown continually through the years, I know some of your newer FashionFixers won't have seen some of the gems that lie in the early end of this blog. 


Photo Amanda Thomas

One of my favourite trends of 2012 was Burberry's tribal inspired beaded yoke adornment on their Spring/Summer Collection. I really think this is a unique addition and surprisingly wearable in the everyday as the gorgeous Eva Lazarus models for us below. 

You will need:

  • pattern paper
  • 3/4 metre cotton fabric
  • 3/4 metre lining fabric
  • sewing machine and matching thread
  • 1/2 metre matching ribbon
  • dressmaking pins
  • dressmaking scissors
  • fimo in assorted colours
  • oven
  • needle and thread

How to do it:
  1. Measure you collar size and add 5 cm, draw this circle on pattern paper. Measure out 17 cm from this line and draw a larger circle, fold in half, press and unfold again. Above the neck opening on the inner edge, measure out 2 cm either side of the centre fold and cut out a segment of the pattern. Cut down the centre fold below the neck opening  leaving you with half the pattern.  Lay onto the fold of the fabric, pin in place and cut out two collar pieces, making sure you include a 1cm seam allowance with both.
  2. Sew ribbon onto both sides of one collar piece.
  3. place the collar pieces right sides together, tucking the ribbons inside. pin in place
  4. using a running stitch sew all the way around, 1cm from the edge, leave a gap at one end to pull through.
  5. Pull the collar through, hand sew the opening closed.
  6. Draw a template of your yoke on pattern paper and mark out your bead design. use this as a reference to make your beads out of Fimo. Make sure to score holes in the beads before you bake them. hand sew them on in thread that matches the yoke fabric


In the studio, working out the pattern after a night of Fimo baking!

Eva Lazarus modelling the yoke, shot by Amanda Thomas, Makeup Jo Williams, Styling Harriet de Winton


Sunday, 27 April 2014

Fashion Fix: How to interface a neckline

Photo Amanda Thomas
Here at Fix Up Look Chic I am very proud to show you my ideas that I first came up with for Cloth Magazine but I am most excited about what lies ahead as this is a fashion and style based craft blog.

One of my favourite tops has been another made from using an existing garment as a pattern. I really think it is such a clever idea as the risk element is diminished, seeing as the new item of clothing is going to replicate one of your tried and trusted wardrobe staples.

However, it is hard to give a step by step guide as each garment is unique. As I did with the blue leopard print sleeveless top, I can describe the methods I sued and be able to chuck in a masterclass - that time about inserting a zip.

This time I hope that I can show you haw to interface a neckline.

You will need:
  • calico to make pattern pieces
  • iron
  • dressmaking pins
  • dressmaking scissors
  • paper scissors
  • fabric (check you old garment's label for fabric info and then take it with you to the shop to work out how much you need.)
  • bias binding for edges
  • fastenings (I needed a zip, but decided to make a feature of it so got a gold chunky one).
  • thread 
  • fabric marker
  • zip foot.
  • interfacing
  • iron
I got all of these things from Fabricland

How to do it:
  1.  Take a deep breath and cut your old garment along each seam to have individual pattern pieces.
  2. iron each piece flat
  3. pin each piece onto calico and cut out leaving a 1.5cm seam allowance. 
  4. label each piece so you remember where they go!
  5. pin to your new fabric and cut out the new pieces. You will now have a collection of fabric pieces complete with seam allowances.
This is the point where our paths part. Each garment is going to be made in its own way, so I can only tell you how I went about reconstructing my garment. 

I want to take this opportunity to talk about how to interface a neckline. Facing a neckline basically means cutting out a strip of fabric that follows the same curve as your neckline that is stitched to the raw neckline edge and folds over inside the garment.

  1. To cut your facing strips, lay out your facing fabric right side up, turn your garment inside out and place on the fabric. Use the neckline as a template for one side of your curve, then measure out 5cm and mimic a similar bigger curve to create a facing strip. Make sure you leave seam allowance at each end. Repeat for front ant back. Mark the shoulder seams. 

  2. Iron on interfacing onto the wrong side of your strips to strengthen the fabric.
  3. Match the strips up at the shoulder seams, pin together and machine a running stitch. Press the seams open. 
  4. The lower edge of the facing just hangs free so it needs to be edged to stop it fraying. If you haven't got an overlocker, use a zigzag stitch or simply cut with pinking shears.
  5. Stay Stitch the upper edge of the neckline facing. This stitch helps prevent the neckline from bunching up when you put it together with the garment.
  6. Pin the facing to the neckline, right sides together. Match up the shoulder seams and centre front to begin with and the rest should fall into place.
  7. Once all matched up, machine a small stitched (1.5mm) running stitch around the top of the neckline.
  8. Trim the raw edges down to reduce the circumference of the curved edge. On any particularly extreme curves it's also helpful to make little snips into the seams up to the stitched line. 
  9. press the seams upwards (away from the garment). Machine a running stitch very close to the seam line, to help the facing roll to the inside of the garment and to keep the seams flat.
  10. Give the fabric a bit of a tug either side of the seam line to smooth things out.
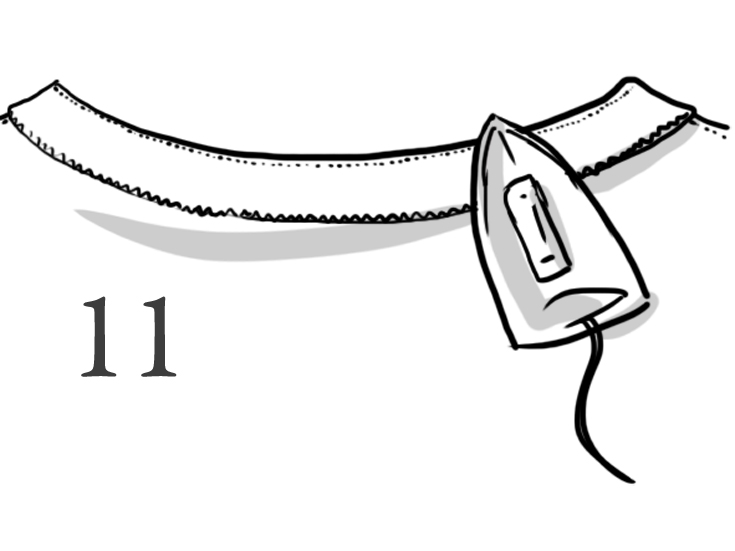
  11. Turn the facing to the inside. roll it into the inside by a couple of extra mm so the seam line is visible from the inside but not the outside.  Press in place.


Wednesday, 23 April 2014

Fashion Fix: Festival Wellies 2: Flower...?

Photo Farrows Creative
I refuse to write 'Flower Power' as that sums up cheap and tacky images for cliched psychedelic hippy fancy dress costumes. Big clusters of oversized flowers have graced headdresses for the past few summers now so why not have them spilling out around the tops of your wellies.

Photo Farrows Creative

There is a bit more of a method to these...

You will need:
  • A pair of wellies
  • assorted brightly coloured fake flowers
  • hole borer
  • contact adhesive
  • Felt

How to do it:
  1. Pull your flowers off their stems, this will leave you with a small nib at the back of the flower,
  2. Bore a hole in your welly. Apply contact adhesive to the back of the flower and the area on the welly surrounding the hole. Leave to go tacky
  3. Once ready, push flower nib through welly hole
  4. press together until contact adhesive fixes. 
  5. Continue to add flowers.
  6. Glue small squares of felt to the inside of the welly over the flower nibs to stop irritation.


Sunday, 20 April 2014

Fashion Fix: Festival Wellies 1: Boho Chic


Photo Farrows Creative
Wellies.

We're all going to need them at some point this summer.

Ros and I designed a pair that would have Sienna Miller knocking down our door to get her mits on them. This was also shot and styled on our summer time shoot for Cloth Mag in Ros's Parents' back garden.

This is a wonderfully simple fashion fix with NO SEWING! Use trim, fringing and anything else you’ve collected to create these festival fantastic ethnic willies. Use Contact adhesive and create a neat finish by placing all seams to the centre back of the wellie. I got the mad fringing trim from a Vintage upholstery stall at a market, and the boho beaded trim from an Asian specialist fabric shop. The colours and detailed embellishments that you find in such specialist shops beats the british counterparts hands down when it comes to Festival Boho Chic.

Boho not your thing? Look out for the second post in the Festival Wellies series for something a bit more flowery...

Wednesday, 16 April 2014

Fashion Fix: China Hair Comb

Photo Amanda Thomas
This was a project I thought up for Cloth magazine, when the byzantine Dolce and Gabbana fashion was all the rage. I still think there is a lot of decorative, pastoral imagery about, and now we're in Spring this is one of my favourite accessories. We did this shoot at The Old Book Shop in Bedminster, Bristol. An amazing bar, full of curios and taxidermy.

I also think this would make a gorgeous wedding hair accessory. Something Old???

I had some fun looking for the bits and pieces to put on the hair clip. I ended up spending about 70p in all at a church jumble sale.


Before and After the Hammer.
who'd have thought they would make such a lovely hair accessory!
You will need:
  • assorted ceramic flowers (from ornaments)
  • araldaite
  • metal hair comb
  • felt
  • gold paint
  • paint brush
  • hammer


How to:
  1. use the hammer to knock the flowers off the ornaments
  2. arrange the flowers in a cluster on the felt
  3. mix the araldite and glue all the pieces on to the felt and to each other.
  4. trim the excess felt away. Dry brush some gold paint on the edges of the petals and on any visible felt.
  5. glue the comb on the back.


Sunday, 13 April 2014

Fashion Fix: Spring/Summer 2014 trend Shirt Dress with extra panels


photo Amanda Thomas
This is already one of my favourite outfits for spring! I love the subtle colour and pattern clash, resulting in a dress that looks far more expensive than it actually was. The dress was left over from a photoshoot, but of course didn't fit as it's a size 8. It was at this point I came up with a simple sewing plan to make this dress fit, whilst at the same time incorporating another fabric and pattern into what could look a bit like a nurse's outfit if I wasn't careful!

shirt dresses as seen at Alexander Wang and Dior, photos Google Images
Shirt dresses are seeing a resurge, they are all over the spring summer catwalks for 2014 and graced the front page of this weekend's Saturday Telegraph's Magazine.

You will need:

  • unpicker
  • dressmaking pins
  • dressmaking scissors
  • 1/2 metre of fabric for panels. Choose a contrasting coloured or printed fabric to add a pop of colour to the dress.
  • sewing machine
  • matching thread.
How to do it:
  1. Unpick the side seams and 15 cm of the hem either side of each side seam, press open.
  2. measure how wide you want your panel to be. Mark and cut out rectangles with this width plus 3 cm seam allowance and length the same length as open seam plus same seam allowance as dress hem.
  3. turn dress inside out and pin in panel right down to the raw hem of the dress. Allow for the seam to taper inwards at the top as it reaches the bottom point of the sleeve.
  4. machine a running stitch along the pinned sides.
  5. press the seams open.
  6. fold up the dress hem
  7. sew back in place now with the new panel.


photo Amanda Thomas


Wednesday, 9 April 2014

Fashion Fix: Festival Headdress

Photo Farrows Creative
Native American chief headdresses are large and ornate, usually made with feathers and beads. In recent times they have become the ultimate festival accessory. Traditionally made with eagle feathers and worn as ‘warbonnets’, the headdress is steeped in history and instead of trying to recreate these incredibly intricate and superior creations, I have simply taken inspiration from the majestic image they present and created our own magnificent plumage for the festival-goer.

This gorgeous photoshoot was done in Ros's parents back garden, using a load of our friends for festival goers in the background and shot by Toby Farrow. It was featured in Cloth Magazine, which Ros and I used to come up with projects for and style the shoots. We built up a wonderful relationship with Toby as our photographer, and I hope the fun we had that day comes out in these shots.

I have collected together a number of projects made for summer issues of Cloth to inspire you over the next few months in time for summer Festival Fashion.


Photo Farrows Creative
You will need:
  • 2 metre x 2 inch thick strip of leather
  • 1m x 1 inch thick braid
  • 2m brightly coloured trim
  • assorted colours and lengths of ribbon
  • assorted beads
  • feathers: imitation eagle feathers, pheasant feathers, coloured quills, biots and strung biots. We used in excess of 100 feathers.
  • 2 Large disc-shaped gems
  • contact adhesive
  • glue gun and glue sticks
  • tape measure
  • fabric and paper scissors
  • sewing machine with leather needle
  • 20cm of 1 inch thick elastic
  • all purpose glue


How to do it:
  1. Measure your head circumference. Cut a length of leather that goes from ear to ear across the forehead. 
  2. Complete the circumference with the elastic, sew to the leather to make a head band.
  3. Starting at one end of the leather strip, tuck the end of the braid under and sew in place.  Fold and press so that the braid sits along the leather. 
  4. Create channels for each quill within the leather and braid by machining running stitches all the way along the leather headband.
  5. Tuck the end of the braid under to finish. 
  6. Using your larger feathers (pheasant and coloured quills) place a blob of all purpose glue on the quill nibs and push into the braid tunnels making sure your longer feathers are more central. Arrange to your own design
  7. Cut the remaining leather in half to give you two equal lengths. These will be the pieces that hang down either side of the main head band. Apply a thin layer of contact adhesive along the strip as well as to the nibs of the feathers. Leave to go tacky and then arrange feathers down these strips. Keep the longer feathers at the top of the strip and allow them to gradually shorten to a point at the bottom.
  8. Use your strung biots to add another layer of feathers to the central headdress and down the sides again using contact adhesive. Build up your feathers until you are happy with the look.
  9. Using all purpose glue use your coloured trim to cover the line of where all the feathers are glued onto the side strips of your headdress..
  10. Work out the angle you want the side pieces to hang off the main headdress and attach with contact adhesive.
  11. String assorted beads onto assorted ribbons and glue on the join either side of the headdress. Place excess feathers on if there is a gap between the main headdress and the side feathers. Place a large gem on top of all this with contact adhesive. Embellish and adorn your headdress to your own taste.


Photo Farrows Creative

Ros plus headdress, all of us camping in Bude


Nominations are still coming in for Company Magazine's Style Blog awards. I am going for the Best Personal Style Blog-Newcomer' Award. If you think this blog shows any signs of such a thing, then nominate me HERE